Integrations
On this page
- Where to Configure Integrations
- Integration Matrix
- Storage and Scope
- Jira
- Connect Jira
- How Agents Use Jira
- Slack
- Connect Slack
- How Agents Use Slack
- Gmail and Google Workspace
- Google Card States
- Guided Google Setup
- Authorization Modal
- Gmail Capabilities
- Google Drive, Docs, Sheets, and Slides Capabilities
- Google Calendar Capabilities
- Browser Automation
- Connect Browser Automation
- How Agents Use Browser Automation
- OTRS / Znuny
- Connect OTRS
- How Agents Use OTRS
- Agent Account Binding
- Configuration Behavior
- Troubleshooting
- Integration Not Available
- OAuth Callback Issues
- Google Drive or Calendar Does Not Work
- Google Setup Rejects the JSON
- Browser Automation Fails to Launch
- OTRS Auth Fails
Integrations connect Code Overlord to the outside services your agents need: issue trackers, chat, email, Google Workspace, browser sessions, and internal ticketing. In the app these connections are also called Alliances; an Alliance is simply a saved account or service connection that minions and agent sessions can use through MCP tools.
This guide covers the built-in desktop integrations:
- Jira
- Slack
- Gmail
- Google Drive, Docs, Sheets, Slides, and Calendar
- Browser Automation
- OTRS / Znuny, when the internal
CODE_OVERLORD_OTRSfeature flag is enabled
For the MCP server and third-party MCP backends, see MCP Tools.
Where to Configure Integrations
- Open Armoury (Settings).
- Select Workspace > Integrations in the left sidebar.
- Use each card's toggle to enable or disable that Alliance.
- Expand a card with its chevron when you need to edit fields.
- Use Test connection where the card provides it.
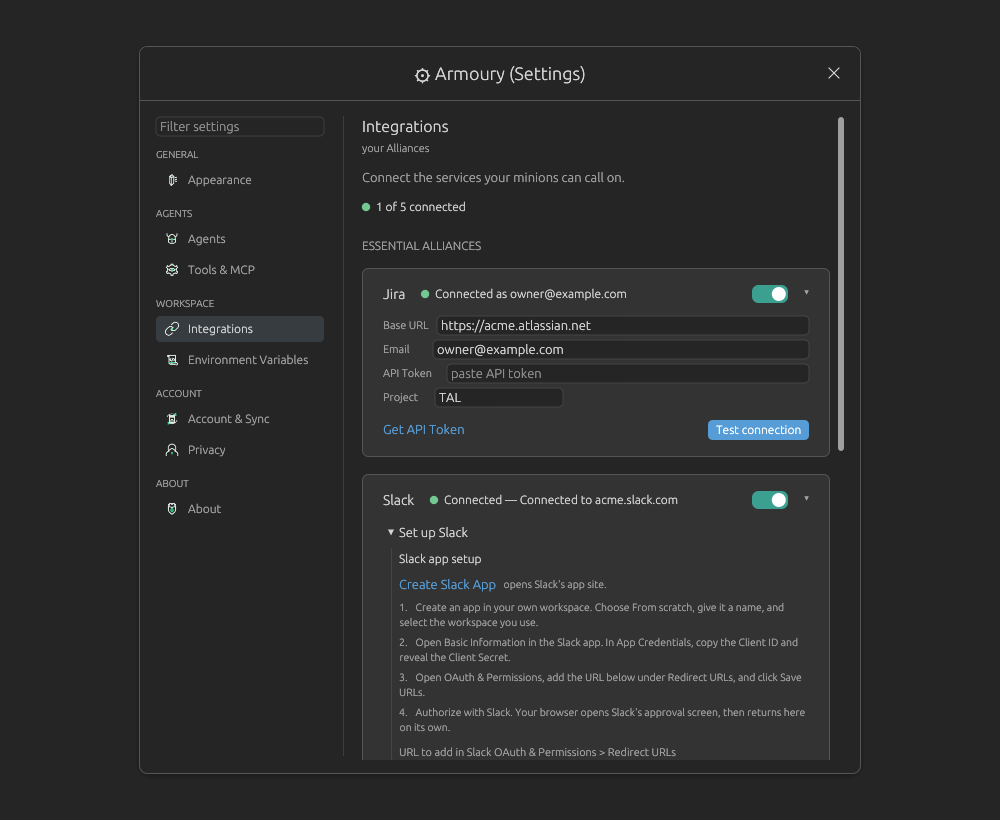 The Integrations page in Armoury, subtitled "your Alliances." A status chip near the top reads "X of Y connected." The page is workspace-scoped: linked accounts apply to the current workspace's minions.
The page carries the subtitle your Alliances and shows a "X of Y connected" status chip so you can see coverage at a glance (Gemini is built in through the Code Overlord cloud proxy and is not counted as an Alliance). Cards are grouped under three headings:
- ESSENTIAL ALLIANCES: Jira, Slack, and Gmail.
- FORGE ALLIANCES: GitHub API and Browser Automation.
- DISTANT ALLIANCES: OTRS / Znuny. This heading is a collapsed section that appears only when
CODE_OVERLORD_OTRSis enabled; expand it to reach the card.
Tip: Configured cards usually collapse to a status row. If a card looks too small, use the chevron on the right of the row to expand it.
Note: GitHub API (under FORGE ALLIANCES) is not exposed as an MCP tool. It stores a GitHub Personal Access Token — auto-imported from the
ghCLI when one is detected on yourPATH— that agents use through ordinarygitandghcommands in the terminal. The MCP-tool integrations documented below are Jira, Slack, Gmail, Google Workspace, Browser Automation, and (internal-only) OTRS.
Integration Matrix
| Integration | How you connect it | What agents can do with it |
|---|---|---|
| Jira | Base URL, Atlassian email, and API token | Search issues, read issue details, create and update issues, add comments, transition workflow status, assign issues, download attachments, read worklogs, and inspect create metadata |
| Slack | Slack OAuth app credentials and a user OAuth grant | Send, update, and delete messages; list channels/users/DMs; join public channels; read channel history and thread replies; search messages; react or pin; upload, list, inspect, and download files |
| Gmail | Guided Google OAuth setup from the Gmail card | Search and read mail, send/reply/forward, create and send drafts, manage labels, archive/trash/untrash, star/unstar, list threads, read profiles, download attachments, and export .eml files |
| Google Drive / Docs / Sheets / Slides | Same Google grant as Gmail | Manage Drive files/folders, sharing, permissions, comments, revisions, downloads/exports, Google Docs content, Sheets rows/cells, and Slides presentations |
| Google Calendar | Same Google grant as Gmail | List/manage calendars, list/create/update/delete/move events, expand recurring events, query free/busy, quick-add events, list attendees, RSVP, and inspect colors/settings |
| Browser Automation | Local isolated browser profile, optional Chrome path, Chromium install | Navigate, discover page elements, click/type/upload/download, inspect cookies/storage, capture screenshots and DOM snapshots, evaluate JavaScript, ask browser/DOM questions, and show/hide the browser |
| OTRS / Znuny | GenericInterface URL, username, and password | Search, read, create, and update tickets; add internal articles; reply to customers; list metadata; download attachments |
Storage and Scope
Code Overlord separates configuration, account tokens, and per-minion account bindings:
- General integration settings live under the app config directory in
mcp-orchestrator/config.toml. - Jira API tokens, OTRS passwords, GitHub tokens, and Google OAuth token bundles are stored through the platform secret store. On macOS and Windows this uses the platform keychain; on Linux it uses Code Overlord's encrypted file store.
- Slack user OAuth tokens are kept in the Slack token file managed by Code Overlord.
- Google links are stored as credential records for the current subject: the computer default, the active workspace primary, or a specific minion. Older Google token files are migrated when present.
- Manual OAuth app fields, such as client IDs and client secrets entered in advanced setup fields, are saved with integration configuration.
Workspace scope matters. The Integrations page configures the account that this workspace's minions can call on. Individual minions can still link, copy, replace, or unlink their own account records in the minion Accounts panel.
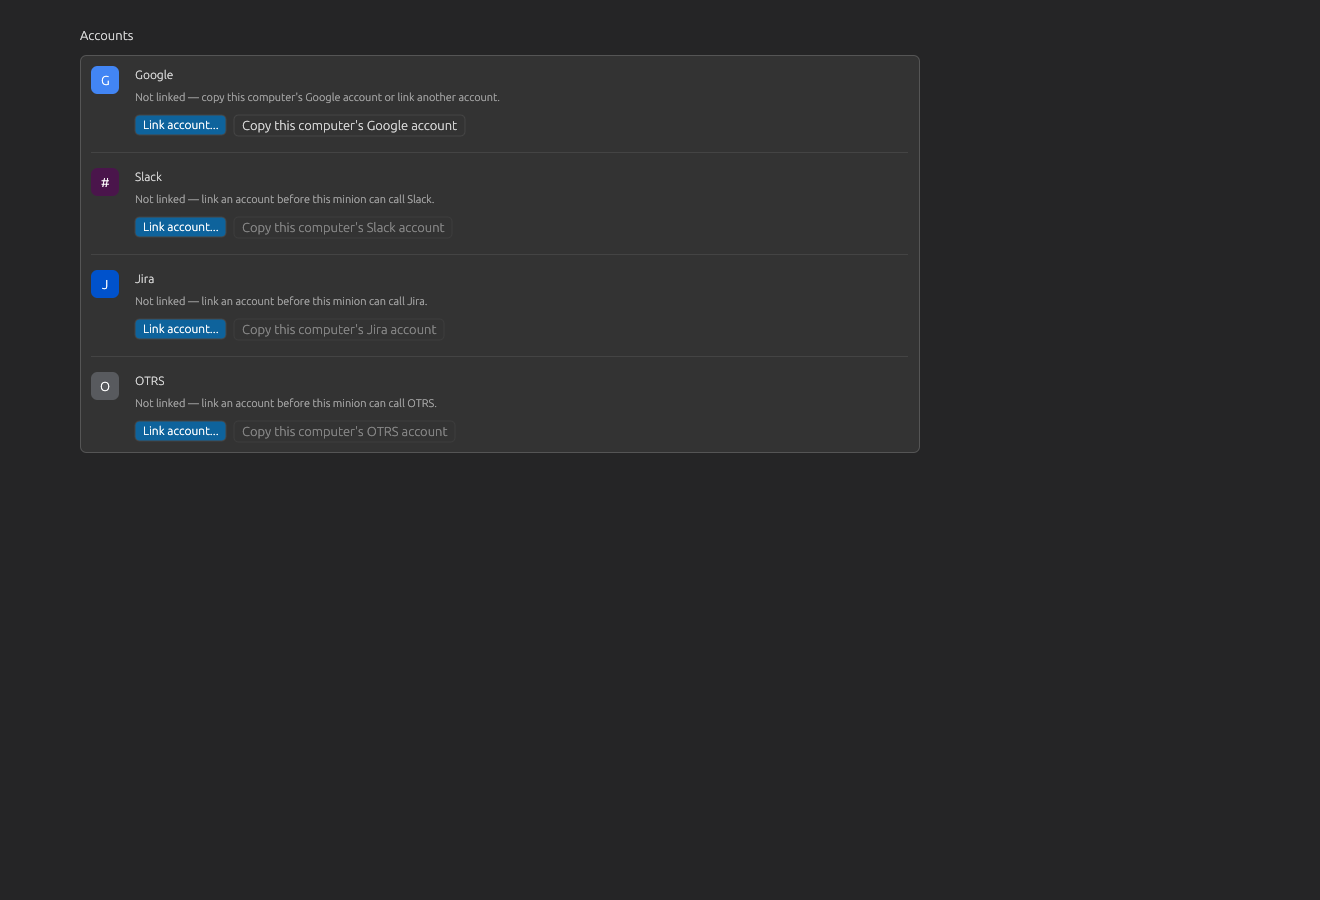 An unlinked minion account can either link a fresh account or copy the computer's Google account settings.
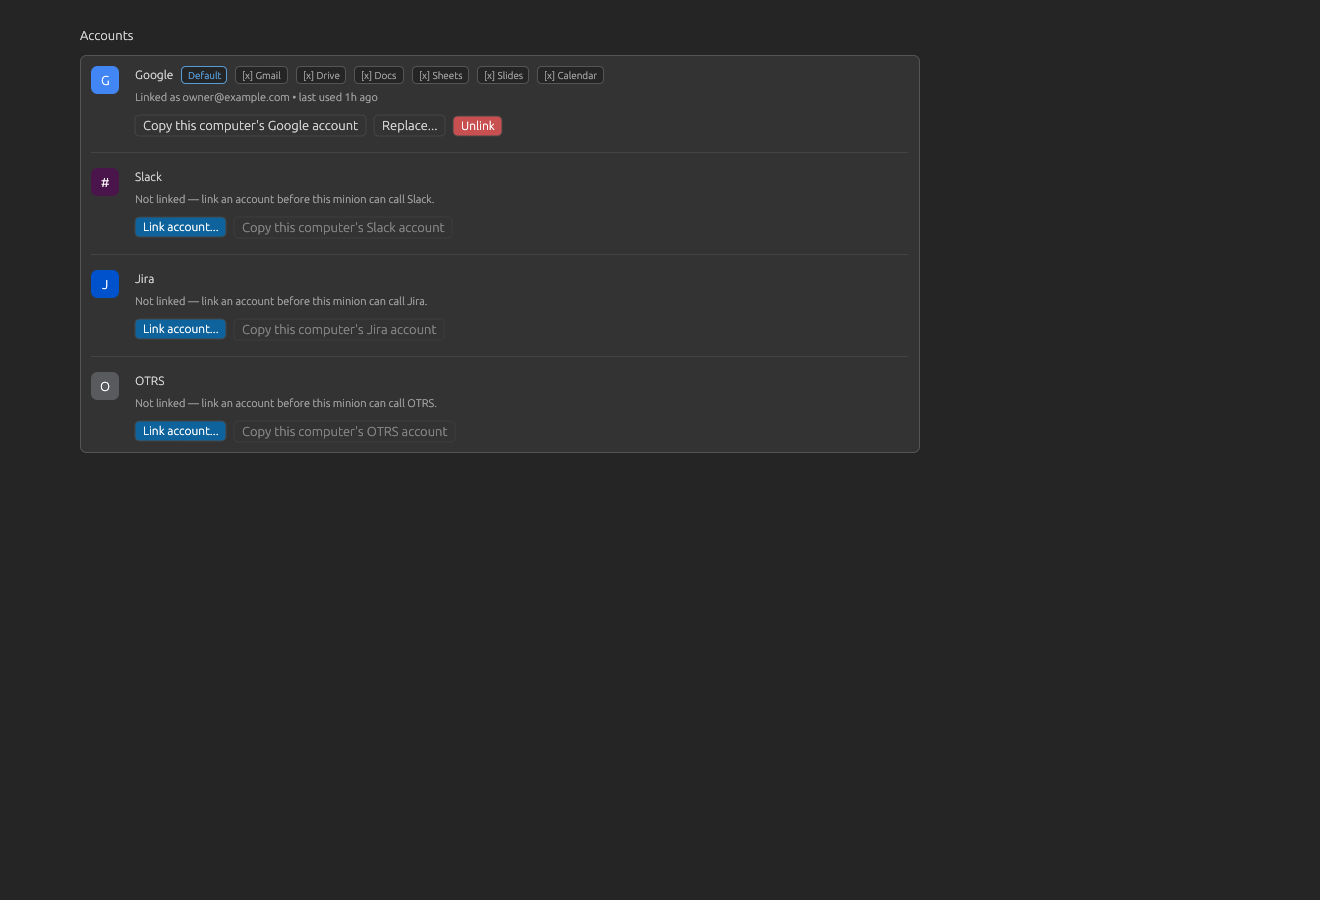 A linked Google account shows the services it can access and provides copy, replace, and unlink actions.
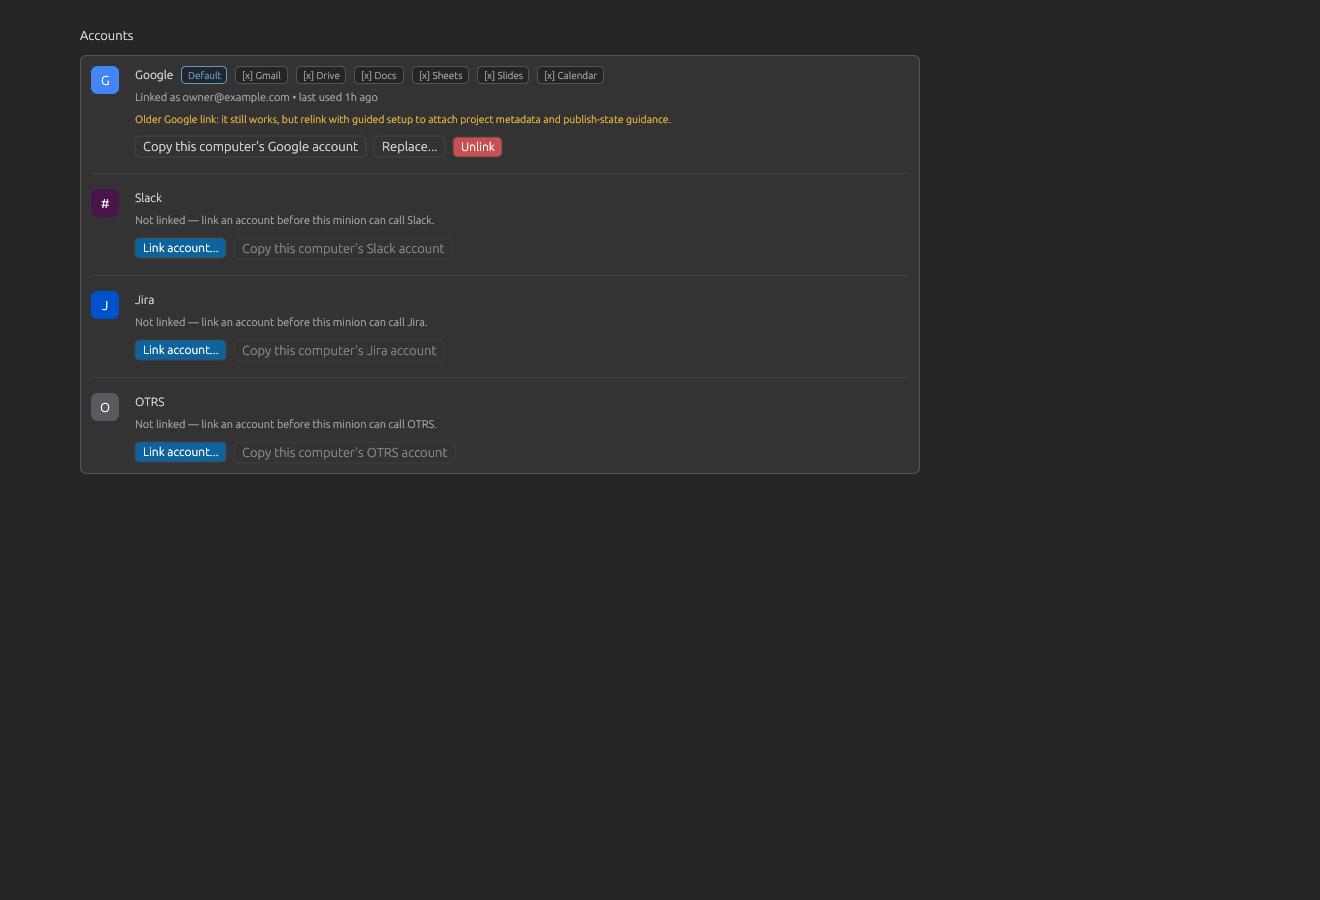 Older Google links continue to work, but the panel recommends relinking when project metadata is missing.
Warning: Copying an existing Google connection copies the desktop app key so a fresh sign-in can be performed. It does not copy an existing signed-in user's refresh token to another minion.
Jira
Jira integration gives agents issue-tracking tools through the jira MCP tool.
Connect Jira
- In Atlassian, create an API token from your account security settings.
- In Armoury > Integrations > Jira, turn the card on.
- Enter Base URL, for example
https://your-domain.atlassian.net. - Enter the Atlassian account Email.
- Paste the API Token.
- Optionally set a default Project key such as
ENGorTAL. - Click Test connection.
How Agents Use Jira
Agents call the top-level jira tool with an operation and params. The supported operations are:
get_issue,search_issues,create_issue,update_issueadd_comment,get_commentsget_attachmenttransition_issue,get_transitionsassign_issuelist_projectsget_worklogs,add_worklogget_create_metadata
Common prompts:
- "Find high priority Jira bugs assigned to me and summarize the blockers."
- "Create a Jira issue for this failing test and attach the reproduction steps."
- "Move
PROJ-123to In Progress and add a comment with today's findings."
Tip: For Jira Cloud assignment, agents need an account ID, not a username or email. Ask the agent to inspect an existing issue or user result first when assigning work.
Slack
Slack integration gives agents workspace communication tools through the slack MCP tool.
Connect Slack
The Slack card includes a Set up Slack walkthrough (a collapsible expander) that lays out the same four steps, plus a Copy button for the exact redirect URL to register.
- Create a Slack app at
https://api.slack.com/apps. Choose From scratch, name it, and select your own workspace. - In Slack Basic Information > App Credentials, copy the Client ID and reveal/copy the Client Secret.
- In OAuth & Permissions, add the redirect URL shown in the card under Redirect URLs, then click Save URLs. Use the card's Copy button so the value matches exactly.
- In Armoury > Integrations > Slack, turn the card on.
- Paste Client ID and Client Secret.
- Optionally set Default Channel, such as
#general. - Click Authorize with Slack and approve the app in your browser. The browser opens Slack's approval screen, then returns to Code Overlord on its own.
- Return to Code Overlord and click Test connection.
Note: The Slack redirect URL is a hosted address such as
https://codeoverlord.dev/slack/callback(staging shows a?variant=stagingsuffix), not alocalhostaddress. Slack does not accept plainlocalhostredirect URLs, so Code Overlord uses this hosted callback, which simply relays the sign-in back to your computer. Always copy the exact URL the card displays rather than typing one by hand.
How Agents Use Slack
Agents can:
- Send, update, and delete messages.
- List channels, users, and direct messages.
- Join public channels.
- Read channel history and thread replies.
- Search messages.
- Add reactions, pin, and unpin.
- Upload, list, inspect, and download files.
Common prompts:
- "Post the release summary to
#shipping." - "Read the incident thread and summarize decisions and owners."
- "Find messages from last week mentioning the migration plan."
Tip: Slack API calls usually require channel IDs such as
C0123ABC456, not display names. Agents should calllist_channelsbefore posting when you provide only a channel name.
Gmail and Google Workspace
Gmail, Drive, Docs, Sheets, Slides, and Calendar share one Google grant. The Gmail card is the entry point because it owns the Google OAuth setup. Agents use two top-level tools after setup:
gmailfor email-specific operations.google_workspacefor Drive, Docs, Sheets, Slides, and Calendar operations.
Google Card States
When Google is not linked, the Gmail card shows Link Google and the Advanced manual OAuth client expander.
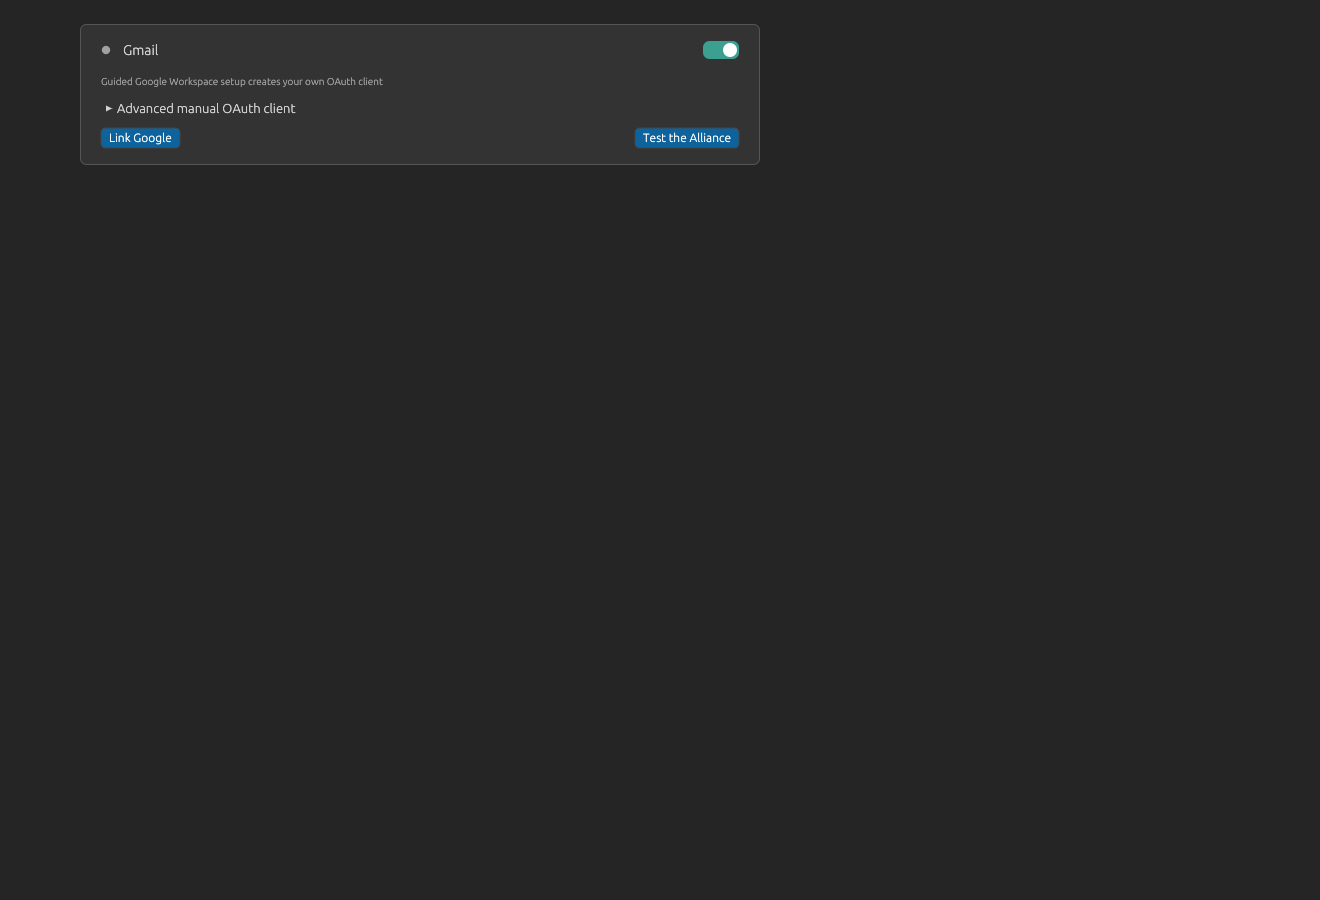 The unlinked Gmail card. Use Link Google for the guided setup path.
When linked, the card shows Test connection and Disconnect. Disconnecting Gmail also removes the shared Google grant used by Drive and Calendar.
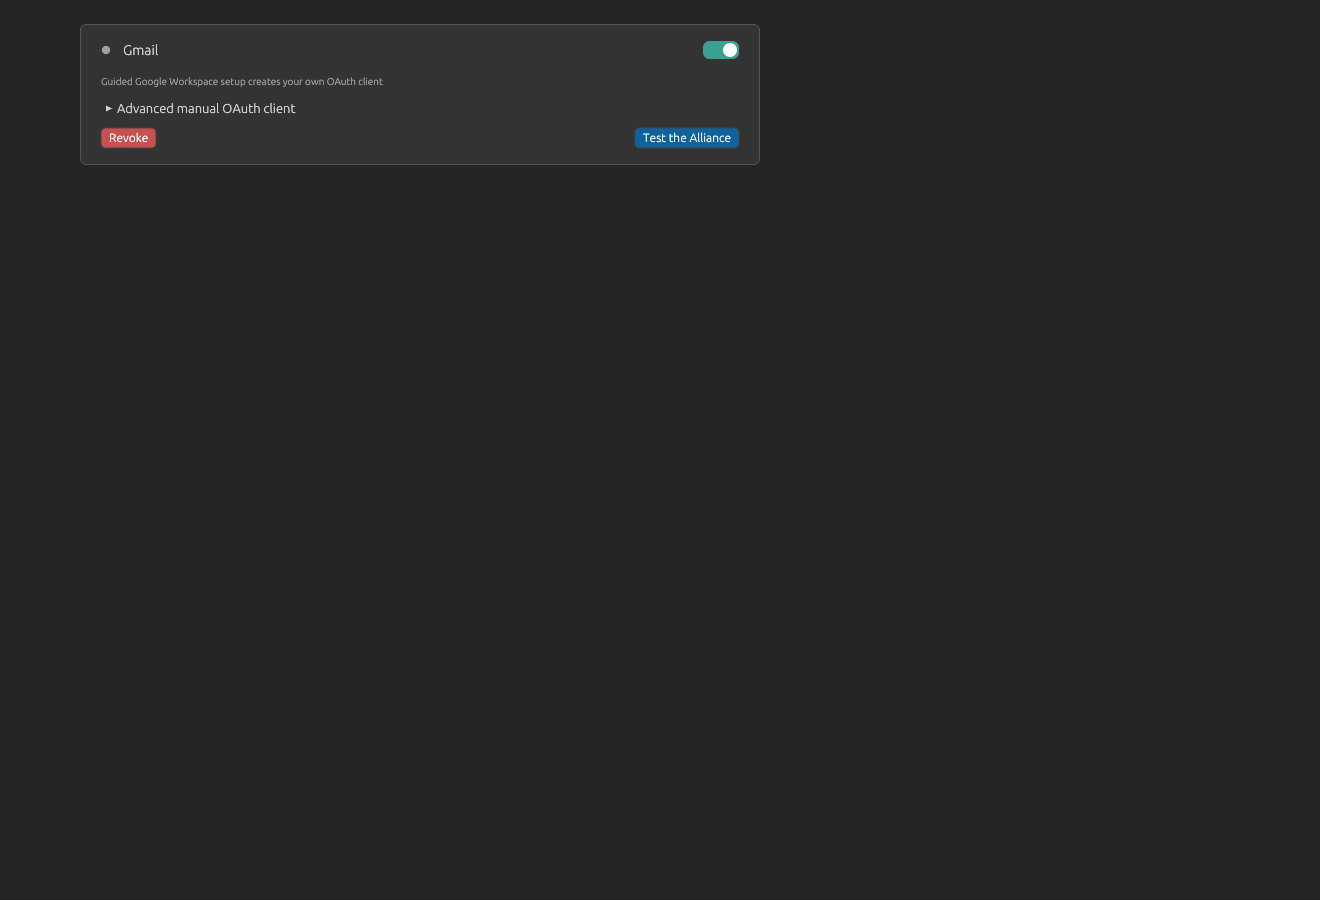 A linked Google card can be tested or disconnected. Drive and Calendar depend on the same grant.
Older manual links continue to work, but Code Overlord may show relink guidance because those links do not include guided-project metadata.
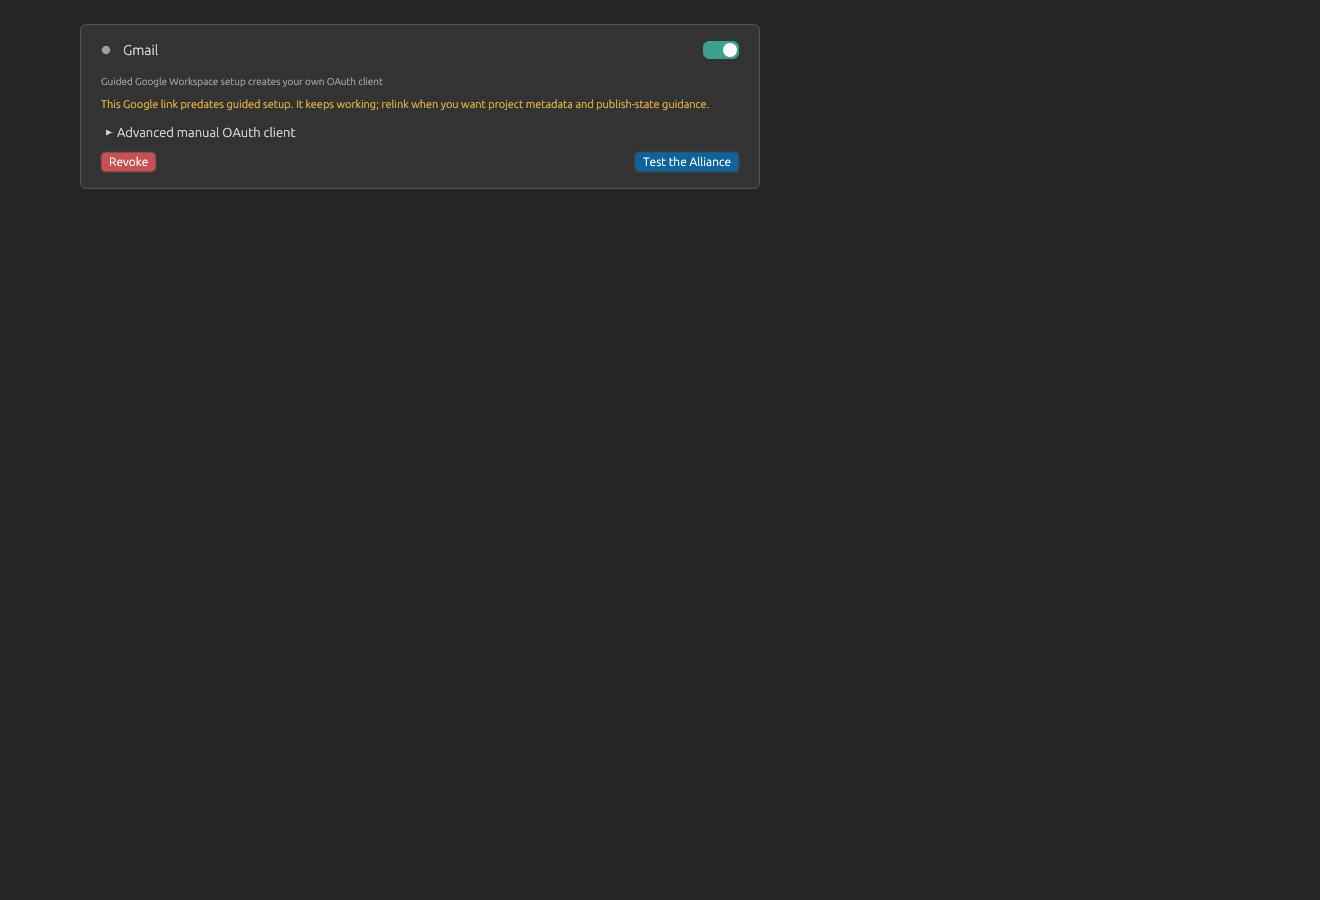 The warning means the current link still works; relink when you want guided project metadata and publish-state guidance.
Guided Google Setup
Use the guided setup unless your organization has already supplied a desktop OAuth client. The flow creates or verifies a Google Cloud project you own, enables the Workspace APIs Code Overlord uses, helps you create a Desktop app OAuth client, validates the downloaded JSON, then performs the final Google sign-in.
- In Armoury > Integrations > Gmail, turn on Gmail.
- Click Link Google.
- Choose the path that matches what you have.
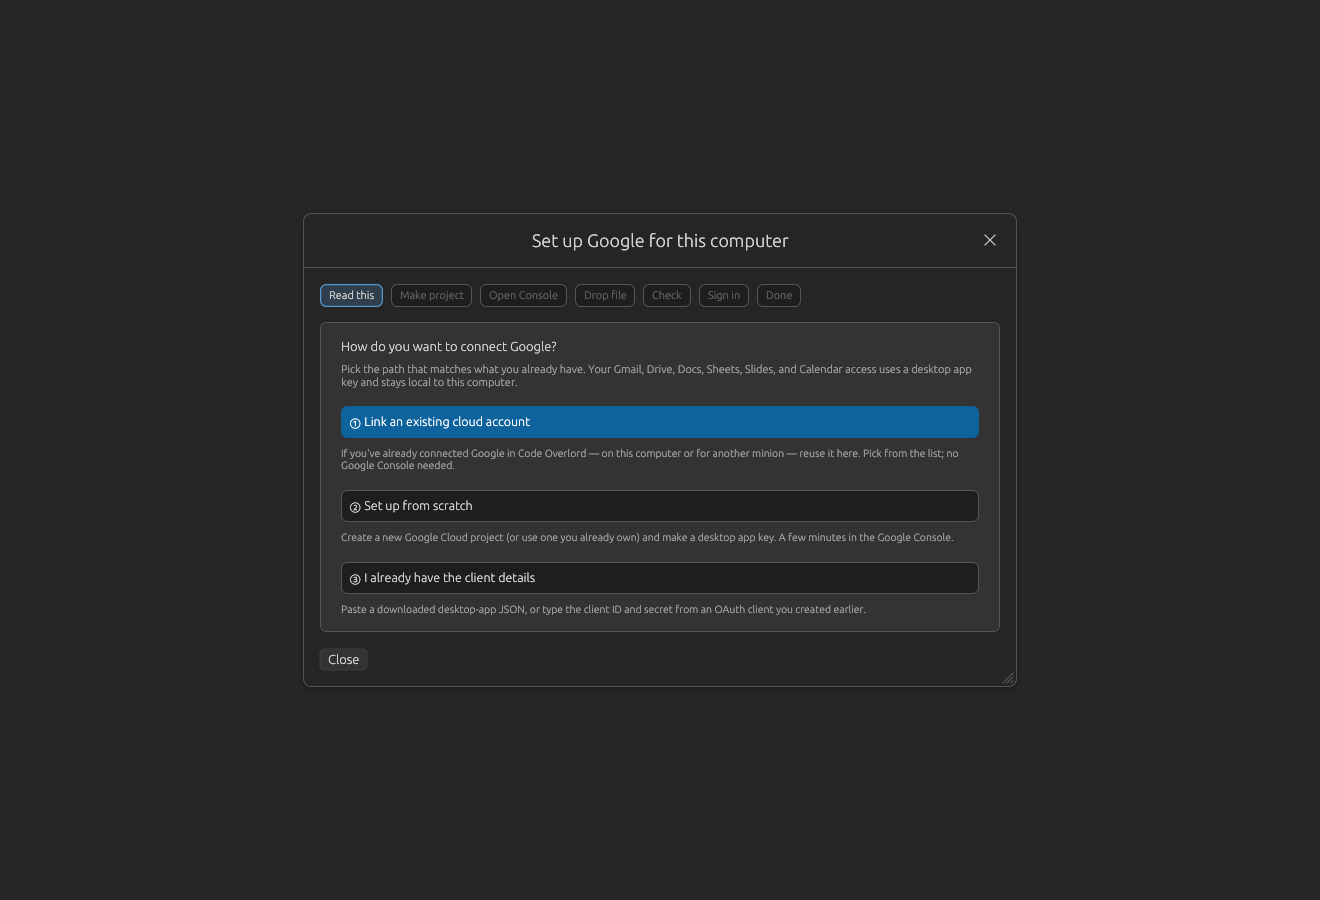 The first step lets you reuse an existing connection, set up from scratch, or enter client details you already have.
The three choices are:
- Link an existing cloud account: reuse a Google connection already set up in Code Overlord. This copies the desktop app key and then runs a fresh sign-in.
- Set up from scratch: create or verify a Google Cloud project and prepare a new Desktop app client.
- I already have the client details: paste a downloaded Desktop app JSON or enter the client ID and secret manually.
If you choose reuse, select an existing connection and click Use this connection.
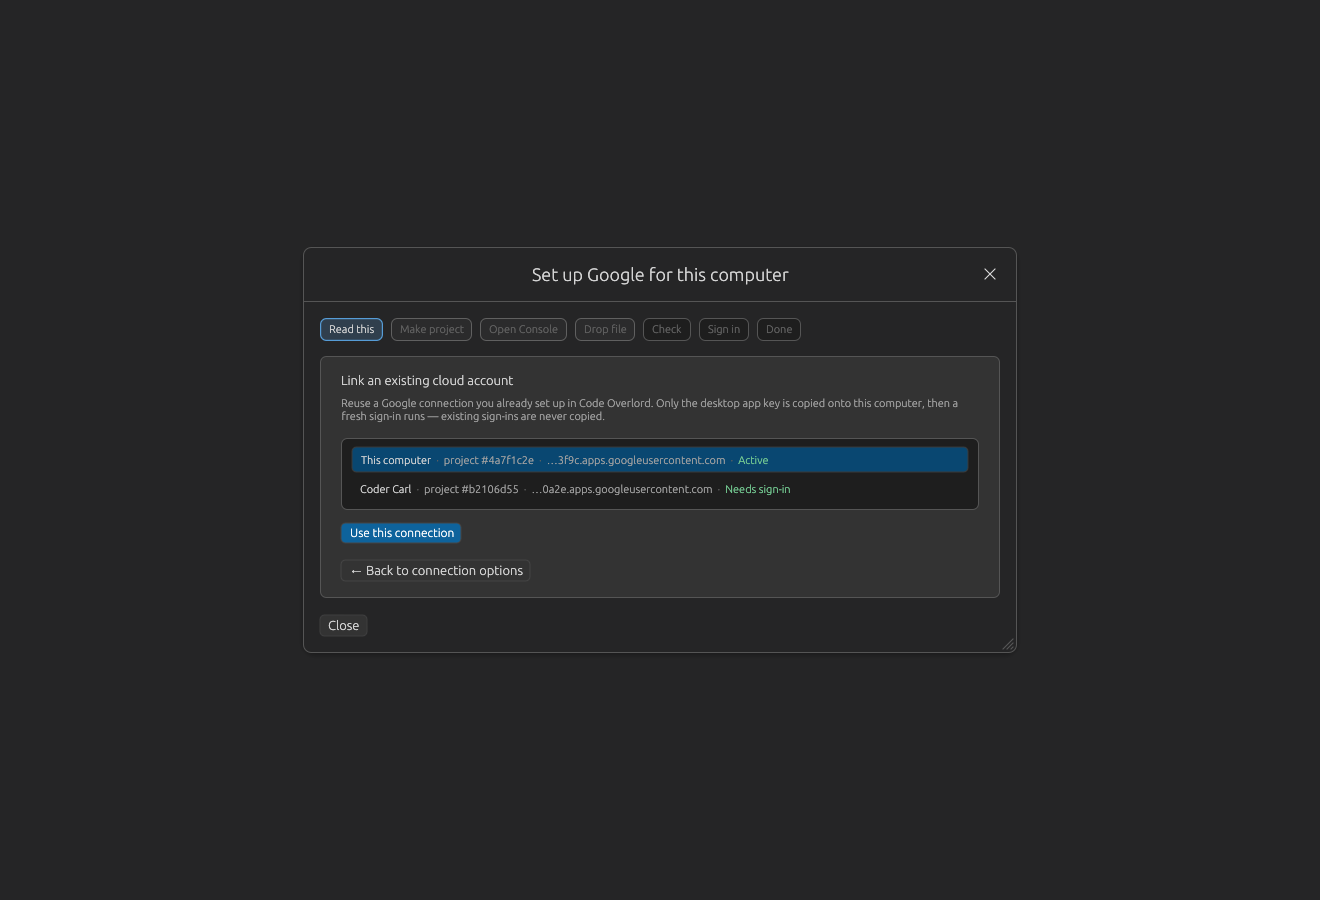 The reuse picker lists existing Google connections and shows whether each one is active or needs sign-in.
If you set up from scratch:
- Enter a Project ID, Project name on Google, Support email, and Desktop app name.
- Leave Use an existing Google Cloud project I own off to create a new project, or turn it on to verify and prepare an existing project.
- Click Create my Google project or the equivalent prepare/check button.
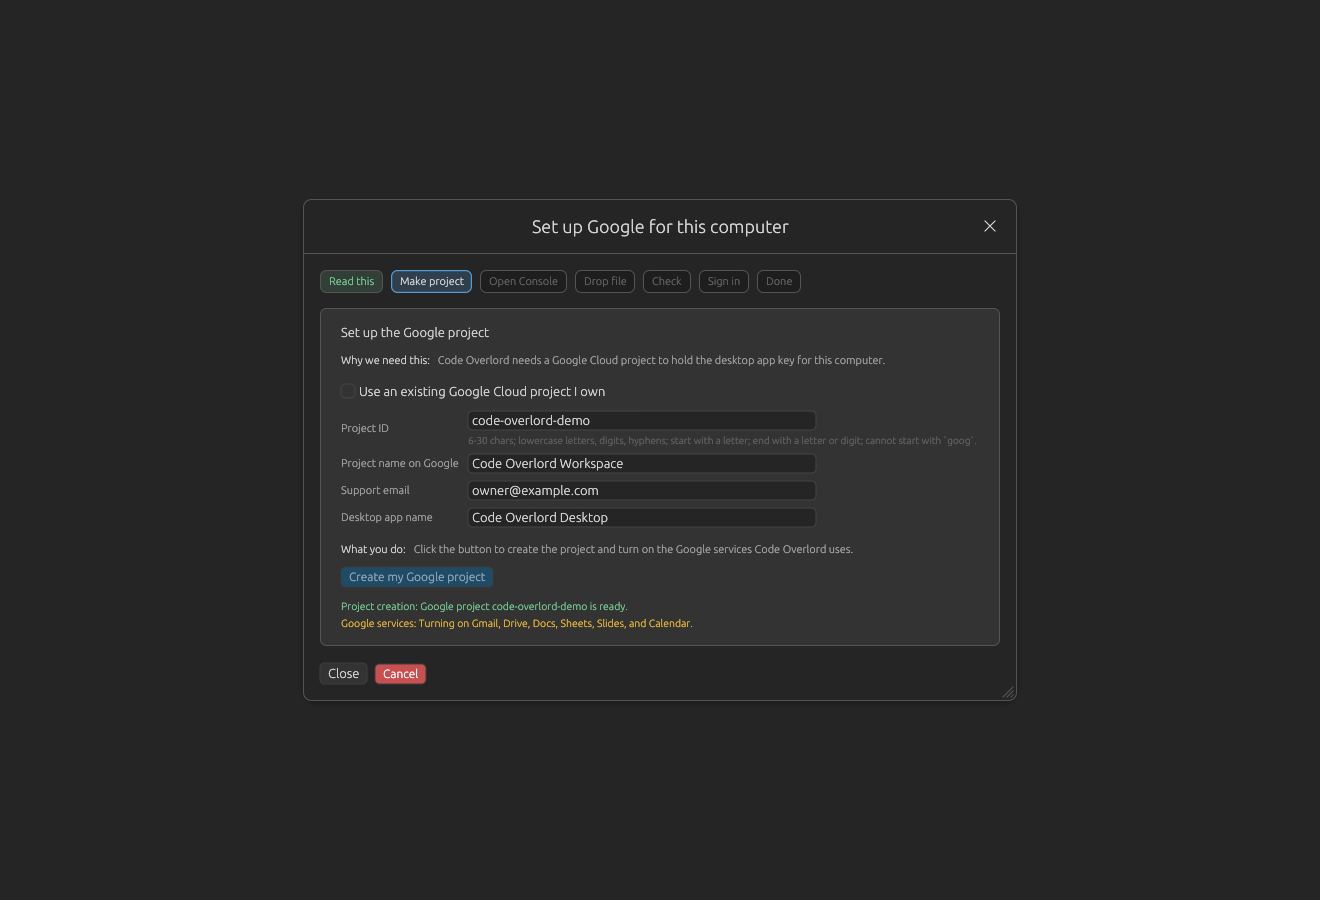 The Make project step creates or verifies the project and turns on Gmail, Drive, Docs, Sheets, Slides, and Calendar APIs.
When provisioning succeeds, open Google Console from the guided modal:
- Click Open Google Console.
- In Google Console, confirm Application type is Desktop app.
- Click Create.
- Download the OAuth client JSON.
- Return to Code Overlord and click I downloaded the JSON.
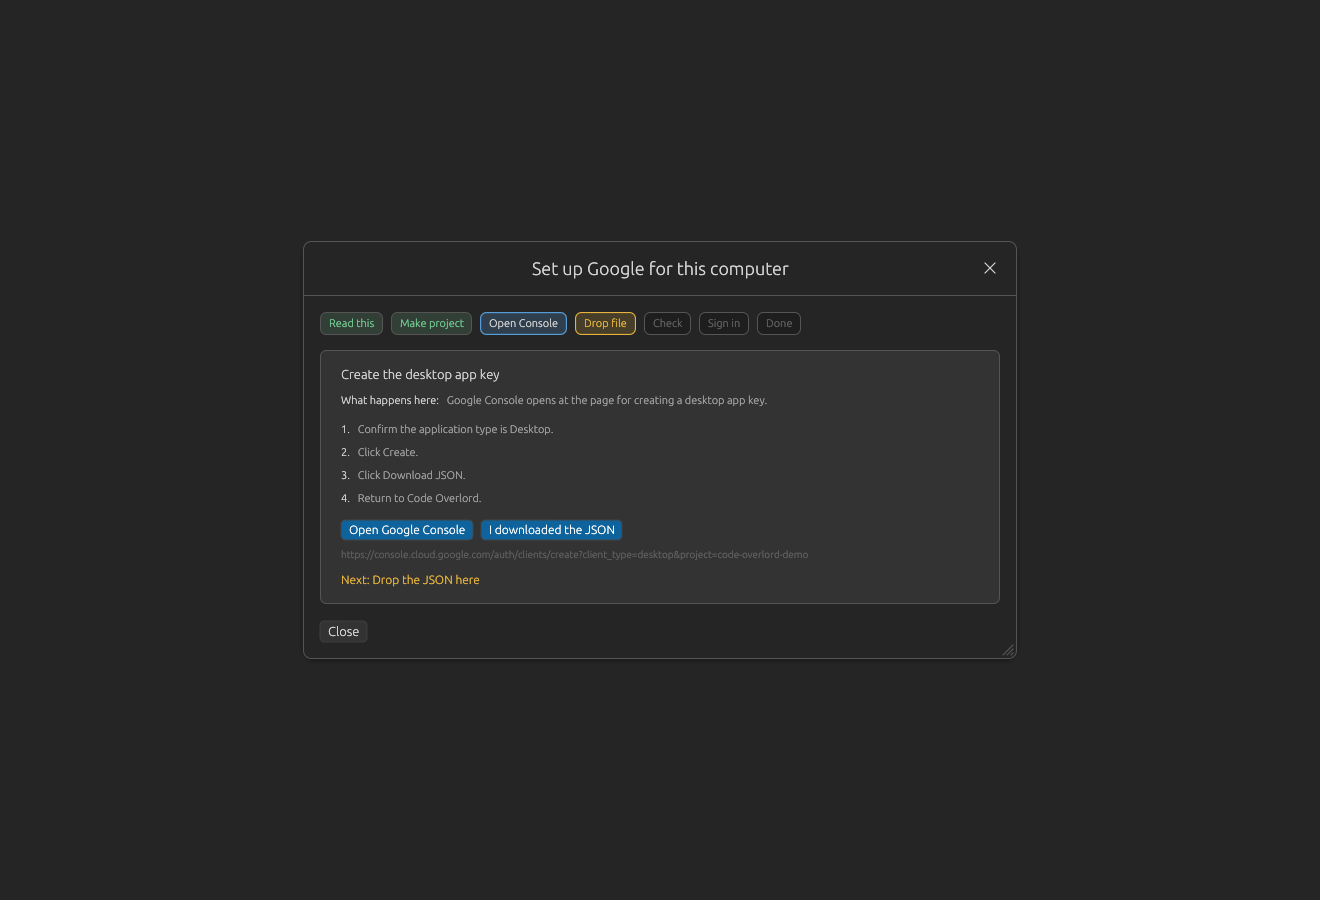 The Open Console step provides the deep link and tells you to download the Desktop app JSON.
Back in Code Overlord, import the JSON:
- Drop the file into the modal, click Choose downloaded JSON, or paste the JSON text.
- Use Manual desktop app fields only if you cannot import the JSON.
- Do not create a Web application client unless your organization specifically requires it.
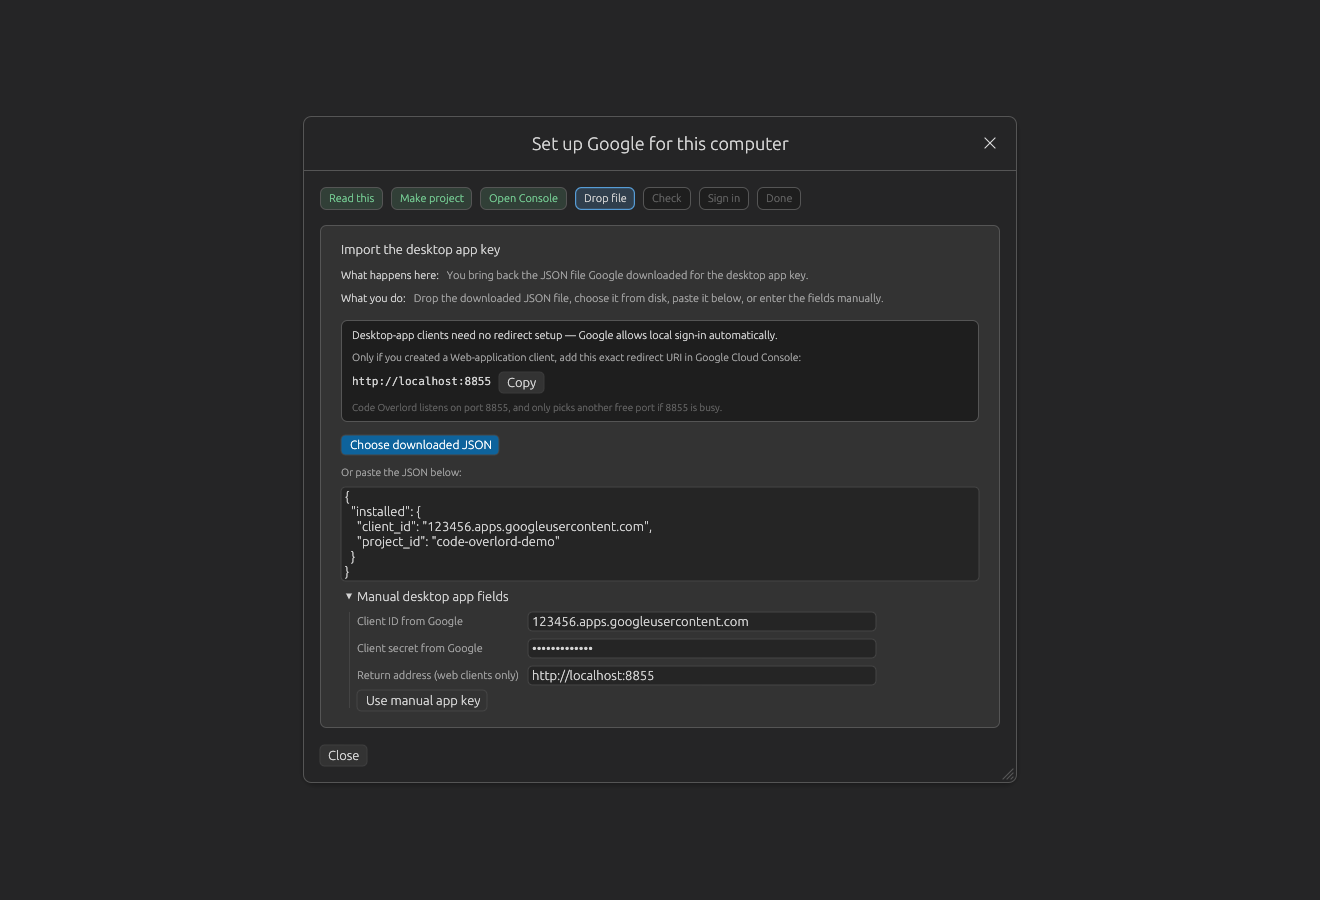 Desktop app clients do not require redirect registration. The localhost URI is shown only for web-client fallback cases.
Code Overlord validates that the JSON belongs to the expected project, is a Desktop app key, and includes localhost redirect support.
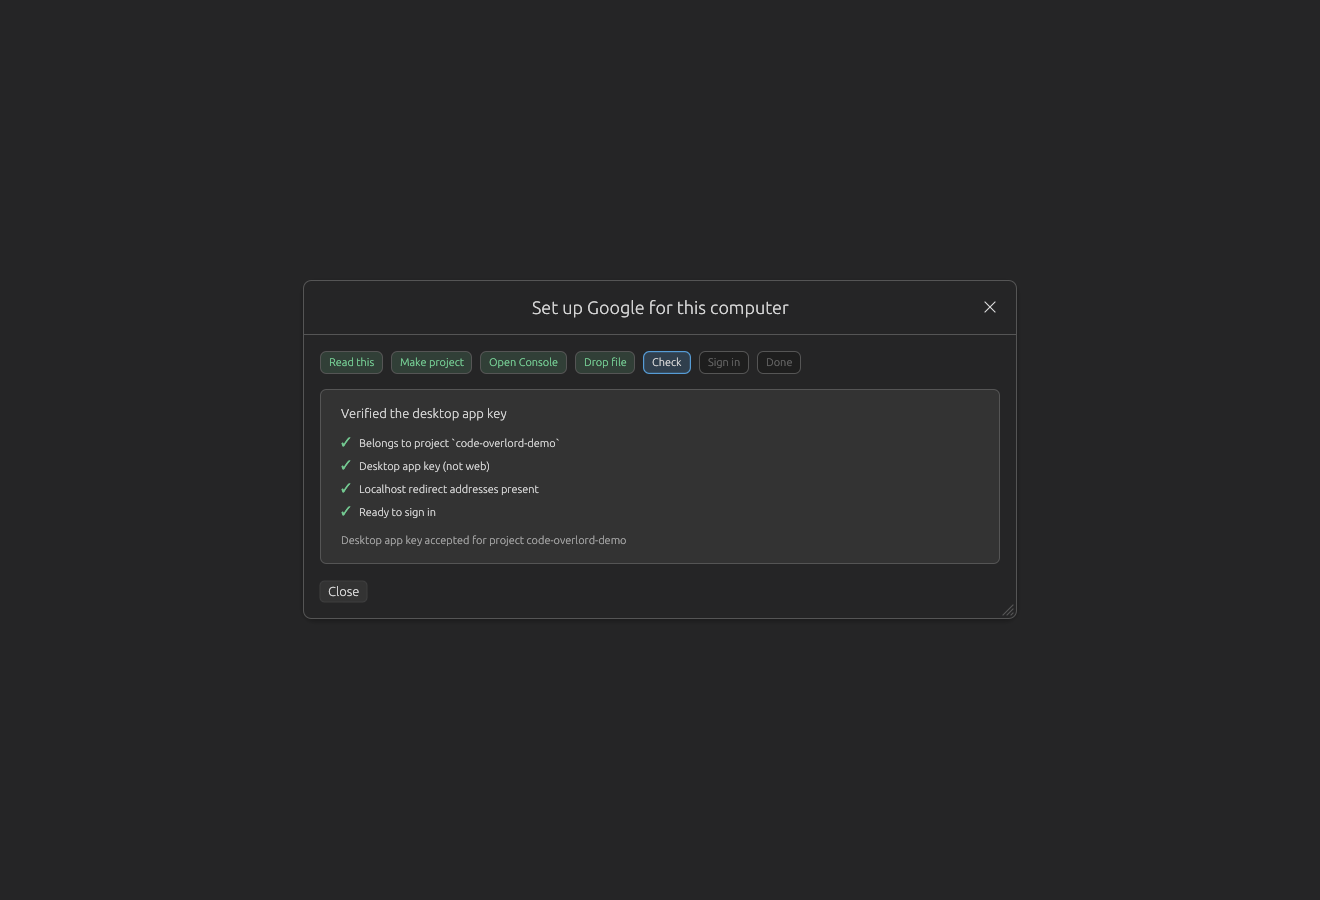 The Check step confirms the Desktop app key is ready for sign-in.
If you accidentally import a Web client JSON, re-import a Desktop app JSON from Google Console.
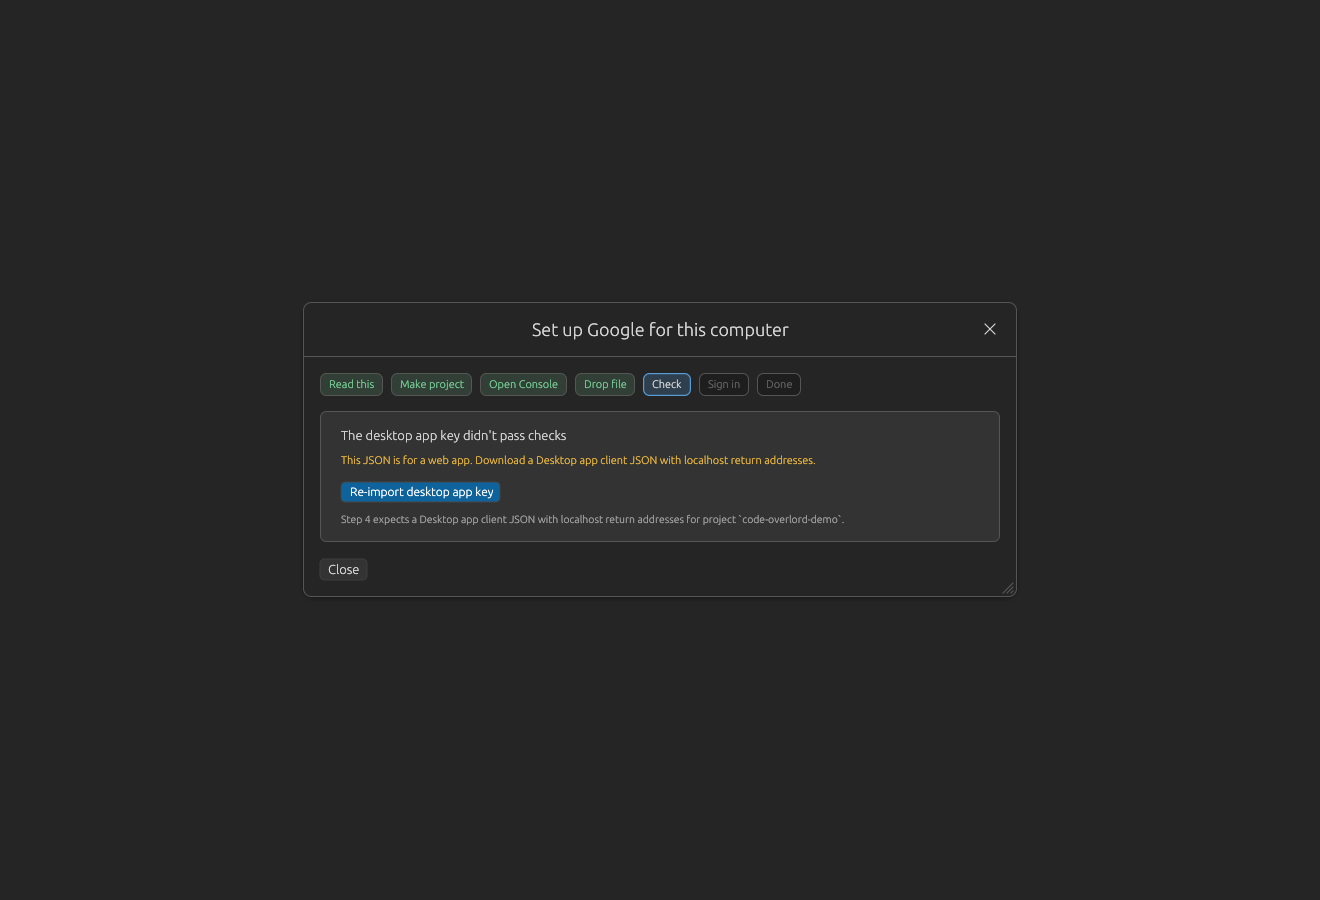 The validation error calls out the most common mistake: downloading a Web application client instead of a Desktop app client.
Finally, approve Google access:
- Read and acknowledge the app-verification warning.
- Click Grant Google access.
- Complete Google sign-in in the browser.
- Keep the modal open until Google redirects back to Code Overlord.
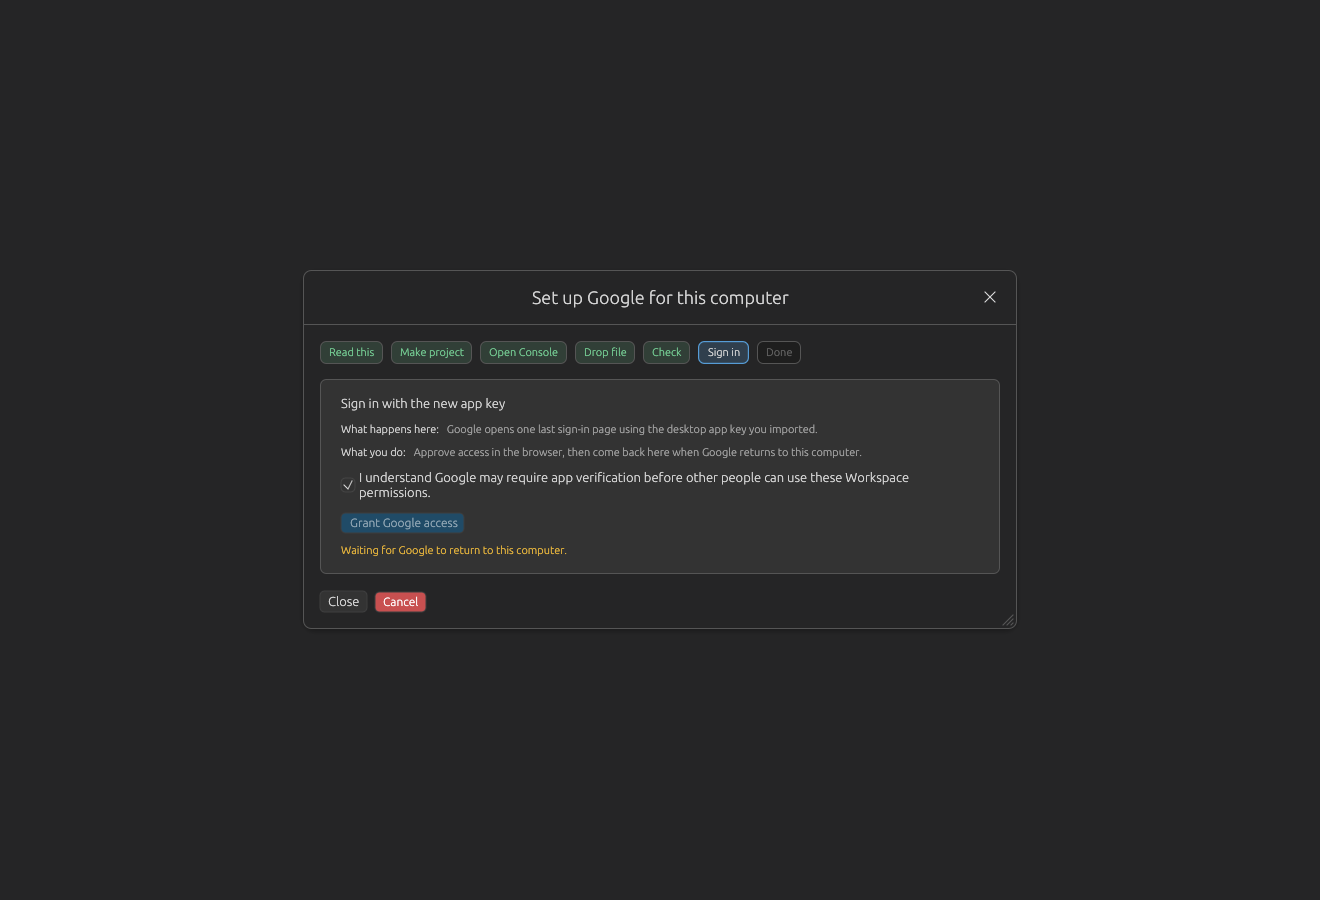 The Sign in step waits for Google to return to this computer after the final grant.
Warning: Google may keep a newly created OAuth app in Testing mode. For larger teams, publish the app in Google Auth Platform and add users as needed. Testing-mode refresh tokens can expire according to Google's policy.
Authorization Modal
During Google and Slack OAuth flows, Code Overlord shows an in-app authorization modal while it waits for the localhost callback. Use the modal's browser controls to open or copy the authorization link, and keep the modal open until the provider redirects back.
If a browser profile is wrong, cancel the authorization and restart the link flow using the browser profile you want.
Gmail Capabilities
Agents can use Gmail to:
- Search and read messages.
- Send mail, reply in-thread, and forward.
- Create, list, update, delete, and send drafts.
- List, create, delete, and apply labels.
- Trash, untrash, archive, mark read, star, and unstar.
- List and inspect threads.
- Get the connected profile.
- Download attachments and
.emlfiles.
Common prompts:
- "Find unread vendor emails from this week and summarize action items."
- "Draft a reply but do not send it until I approve."
- "Archive this thread and add the
Donelabel."
Google Drive, Docs, Sheets, and Slides Capabilities
Agents use google_workspace with service: "drive", "docs", "sheets", or "slides".
Drive operations include:
- List, search, create, upload, update, delete, copy, convert, move, restore, and trash/list files.
- Create folders and list folder contents.
- Share files, inspect permissions, and remove permissions.
- Download/export files to disk.
- Create/list/reply to comments.
- List/download revisions.
- Upload Markdown as a formatted Google Doc.
Docs, Sheets, and Slides operations include:
- Create and read Google Docs.
- Append to or update document content.
- Create spreadsheets, read ranges, update cells, and append rows.
- Create presentations and add slides.
Common prompts:
- "Find the Q3 planning doc and export it as PDF."
- "Create a Google Sheet from this CSV summary and share it with the project team."
- "Upload this Markdown proposal as a formatted Google Doc."
Google Calendar Capabilities
Agents use google_workspace with service: "calendar" to:
- List, create, update, and delete calendars.
- List, create, update, delete, move, and inspect events.
- Expand recurring event instances.
- Query free/busy windows.
- Quick-add natural language events.
- List attendees and respond to invitations.
- Inspect colors and settings.
Common prompts:
- "Show my agenda for tomorrow morning."
- "Find a 30-minute free slot with Alex next week and create a hold."
- "RSVP accepted to the design review and summarize attendees."
Browser Automation
Browser Automation gives agents a local browser tool through the browser MCP tool. It runs in an isolated profile, so first-time logins are remembered for later browser tool calls without using your personal Chrome profile.
Connect Browser Automation
- In Armoury > Integrations > Browser Automation, turn the card on.
- Leave Chrome Path empty to use the default Playwright Chromium runtime, or enter a specific Chrome/Chromium executable path.
- Set the Headless mode checkbox. It is unchecked (visible) by default:
- Checked: run without a visible browser window.
- Unchecked: show the browser window for manual interaction.
- Use Install [Chromium] if the card says Chromium is not installed. If Node.js is missing the card shows Install [Node.js] first instead, because Chromium is summoned through it.
- Click Inscribe & Apply.
Runtime requirements:
- Node.js and
npxmust be available because Chromium installation is handled through Playwright tooling. - If Chrome Path is empty and Playwright Chromium is not cached, install Chromium from the card before expecting browser automation to work.
- If you provide Chrome Path, it must point to a working browser executable.
How Agents Use Browser Automation
Browser operations include navigation, element discovery, clicks, typing, uploads, downloads, cookies, storage state, screenshots, text extraction, DOM snapshots, JavaScript evaluation, page focusing, browser status, and show/hide/close controls. The browser tool also supports list_capabilities and get_tool_schema so agents can inspect the detailed schema before using advanced operations.
Common prompts:
- "Open the staging dashboard, log in, and capture a screenshot of the failing page."
- "Use the browser to fill this form, stop before submitting, and show me the page."
- "Inspect this page and identify the selector for the Save button."
Tip: Use visible mode when a site requires 2FA, CAPTCHA, or manual login. After you finish the human step, the agent can continue in the same browser session.
OTRS / Znuny
OTRS / Znuny is an internal integration. The card and the otrs MCP tool are available only when CODE_OVERLORD_OTRS is set to an accepted true value such as 1, true, yes, or on.
Connect OTRS
- Prepare an API-enabled OTRS/Znuny agent account.
- Confirm your GenericInterface endpoint URL. A typical shape is:
https://<host>/otrs/nph-genericinterface.pl/Webservice/GenericTicketConnectorREST
- In Armoury > Integrations > OTRS / Znuny, turn the card on.
- Enter Base URL, Username, and Password.
- Click Test connection.
Authentication is session-based. Code Overlord exchanges the username and password for an OTRS session ID and refreshes it when needed.
How Agents Use OTRS
Agents can:
list_metadatasearch_ticketsget_ticketcreate_ticketupdate_ticketadd_articlereply_ticketget_attachment
Common prompts:
- "List my open OTRS tickets and group them by priority."
- "Create an internal note on this ticket with the investigation summary."
- "Reply to the customer with the approved outage update."
Tip: Ask agents to call
list_metadatabefore creating or filtering tickets. Queue, state, priority, and type values often need to match your OTRS configuration exactly.
Agent Account Binding
Integrations are exposed to agents through MCP tools, but the account used for a call depends on context:
- Workspace primary accounts come from Armoury > Integrations.
- A minion can have its own account link for Google, Slack, Jira, or OTRS.
- A minion can copy this computer's account setup, then perform its own sign-in where OAuth is required.
- If a minion-specific account is missing, Code Overlord falls back to the available workspace or computer default when the integration supports that route.
This lets you keep a shared workspace default while giving sensitive minions their own account where needed.
Configuration Behavior
- Turning a card off disables client loading for that integration.
- A card status can read Off, Not connected, Connected, Testing..., or Failed.
- Test connection validates the saved settings and updates the card status.
- Saving, revoking, or disconnecting hot-reloads integration clients; you normally do not need to restart Code Overlord.
- Gmail, Drive, and Calendar load together because they share Google OAuth credentials.
- If an integration is not configured, agent tool calls return an explicit "integration not available" style error.
Troubleshooting
Integration Not Available
Check:
- The card is toggled on.
- Required fields are filled.
- The account has completed OAuth sign-in where required.
- The workspace or minion has the account binding you expect.
- The provider token has not been revoked externally.
OAuth Callback Issues
- Both providers hand the final sign-in back to a local listener on this computer. Google uses local port
8855and Slack uses local port8856by default. Make sure these local ports are not blocked by a firewall or another process. - For Slack, the redirect URL registered in your Slack app is a hosted address such as
https://codeoverlord.dev/slack/callback(see the Slack setup steps above). It must match the URL shown on the card exactly; use the card's Copy button. Slack relays the response to the local listener, so a mismatched or missing Redirect URL is the most common cause of a stalled Slack authorization. - For Google Desktop app clients, you normally do not register redirect URIs manually; Google permits local desktop sign-in to
http://localhost:8855automatically.
Google Drive or Calendar Does Not Work
- Confirm the Gmail card is on.
- Confirm Google is linked, not just manually filled with a client ID.
- Click Test connection on the Gmail card.
- If the link predates guided setup, relink when you need project metadata or clearer publish-state handling.
Google Setup Rejects the JSON
- Confirm the OAuth client type in Google Console is Desktop app.
- Re-download the JSON after creating the Desktop app client.
- Import that file again from the Drop file step.
- If you created a Web application client, create a Desktop app client instead unless your organization explicitly told you to use the web-client fallback.
Browser Automation Fails to Launch
- Install Node.js and confirm
npxis available. - Use Install [Chromium] on the Browser Automation card.
- If Chrome Path is set, verify it points to a working executable.
- If Playwright reports missing operating-system packages, install those packages and retry.
OTRS Auth Fails
- Confirm
CODE_OVERLORD_OTRSis enabled; otherwise the card and tool are intentionally absent. - Verify Base URL is the GenericInterface webservice endpoint, not only the web UI root.
- Re-check the agent username/password and API permissions.